Fine-tune FLUX.2 [klein] with a LoRA under 60 minutes


By the end you will have a .safetensors LoRA that teaches klein a specific
style, character, look, or edit behavior, plus the few details that decide
whether the result is usable or mush.
Everything here uses open weights. FLUX.2-klein-base-4B
is Apache 2.0, so you can ship what you train.
Building for the Build Small Hackathon
This guide is part of the Build Small Hackathon, hosted by Gradio and Hugging Face, with Black Forest Labs among the sponsors. The build window is June 5–15, 2026. Two rules shape what you make: the model you use must be 32B parameters or fewer, and your project ships as a Gradio app hosted on a Hugging Face Space.
FLUX.2 [klein] fits the brief directly. The 4B model is well under the 32B cap, it's Apache 2.0 so you can ship whatever you build on it, and it runs on the Space's own GPU. A LoRA is how you make it yours: a specific style or edit that fits your track, whether that's solving a real problem for someone you know (the Backyard AI track) or building something deliberately strange (An Adventure in Thousand Token Wood).
The rest of this guide trains that LoRA. The last section shows how to wrap it in the Gradio app you'll submit.
Why klein for fine-tuning
FLUX.2 [klein] ships in a 4B and a 9B size, each with a distilled (4-step) and a base (50-step) variant. For LoRA training the relevant one is base:
Take the 4B model as an example:
- It fits. ~13 GB of weights in bf16; a LoRA run lands under 24 GB, so a 4090 or an L4 is enough.
- It's the training target. Distilled models are step-compressed for fast inference; you train against the base checkpoint and the adapter still loads on the distilled model afterward — it's faster and, in our testing, usually gives even better results.
If you only want to run a LoRA, you do not need to train one — you can find community klein LoRAs on the Hub already. Train when you need a specific look the existing ones don't cover.
What you'll need
- 15–40 images that share one look (your art, licensed photos, or public-domain works from Wikimedia Commons).
- A GPU for ~60 minutes. An RTX 4090 (24 GB) is the sweet spot.
- A trainer. This guide uses ostris/ai-toolkit, a popular community trainer with a no-code web UI. It's one of several — any klein-compatible trainer works.
Pick your path
ai-toolkit has a web UI, so you don't have to edit YAML by hand unless you want to. Two ways to run it:
| Path | Best for | Setup |
|---|---|---|
| RunPod template | most people, ~$0.50/run | one-click deploy, UI auto-launches |
| Local UI | you have a 24 GB+ NVIDIA GPU | git clone + npm run build_and_start, open localhost:8675 |
The dataset and caption rules below are identical across both. Ostris has a 2-minute walkthrough video if you want to see the UI first.
Step 1: Build a dataset
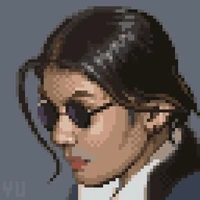
A style LoRA is the easiest win. Say you want to build your own sprite LoRA like the one above. Collect 15–40 images that share one look:
![]()
What a style LoRA gives you: every prompt comes out in one consistent look. These
are from Limbicnation/pixel-art-lora,
a community klein-4B LoRA (Apache 2.0) — prompt pixel art sprite, … and the style
is baked in.
- Diverse subjects, angles, and compositions. Don't repeat the same background.
- At least 1024 px on the long edge.
- One
.txtcaption per image, same filename (img (1).png→img (1).txt).
Caption the content, never the style
For a style LoRA, your captions describe what is in the image and say nothing about the style. The style is exactly what you want the model to infer on its own.
Each caption starts with a trigger word, then a description of the subject:
SPR1TE8. A knight in plate armor holding a sword, facing forward, plain background.
SPR1TE8. A fire-breathing dragon with spread wings, seen from the side.
Do not write "pixel art", "8-bit", "retro game", or "sprite style". If you name the style in the caption, the model learns to depend on that word instead of baking the style into the weights.
Pick a trigger word that is not a real word, so it can't collide with the
model's vocabulary: SPR1TE8, RISO_PR1NT, ZK_TOON. Use it identically in
every caption and in the config.
One deliberate exception: variations you want to control later. Don't caption the one look you always want — let that bake into the trigger. But if your dataset has clear sub-styles you'd like to switch between at inference, name those. The pixel-art LoRA above does exactly this: a handful of its captions tag the variant explicitly.
SPR1TE8. A wizard holding a staff, chibi.
SPR1TE8. A treasure chest, 16-bit pixel art.
SPR1TE8. A castle on a hill, 32-bit pixel art.
Those exact words — chibi, 16-bit pixel art, 32-bit pixel art — become the
modifiers you append at the prompt in Step 4. Whatever you put in the captions is
what you get to dial later, so caption with the controls you want in mind.
Don't want to caption by hand? Any vision model can auto-caption with a "describe only content, no style words" prompt.
Then skim the
.txtfiles and delete any style adjectives that leaked in.
Step 2: Configure the trainer
If you use the web UI, you fill a form — point it at your dataset, select
FLUX.2-klein-base-4B, set your trigger word, and start. If you prefer YAML, the
BFL klein training example
shows the same job as a config file. Three lines change per run:
name:— your output folder.trigger_word:— must match your captions.datasets: folder_path:— where your images live.
Also set the sample.prompts to use your trigger, so the in-training preview images show your style forming.
Step 3: Train
In the UI, click Start. From the CLI:
cd /app/ai-toolkit
python run.py /workspace/configs/my_lora_klein_4b.yaml
It checkpoints every 250 steps and writes sample images alongside each one. An 1800-step run on a 4090 takes under an hour.
Watch the samples, not the loss. This is the thing people most often get wrong.
Loss keeps dropping well past the point where the images start to overfit. For
most style LoRAs the visual peak is around step 750–1500, not the final step.
Open the sample images, pick the checkpoint that looks best, and use that
.safetensors — not necessarily the last one.
Step 4: Use it
Loading a LoRA is two lines on top of the normal pipeline. Here's the pixel-art LoRA from the top of this guide, loaded straight from the Hub:
from diffusers import Flux2KleinPipeline
import torch

pipe = Flux2KleinPipeline.from_pretrained(
    "black-forest-labs/FLUX.2-klein-4B", torch_dtype=torch.bfloat16
).to("cuda")
pipe.load_lora_weights("Limbicnation/pixel-art-lora")

img = pipe(
    prompt="pixel art sprite, a brave knight in shining armor, game asset, transparent background",
    num_inference_steps=4, guidance_scale=1.0,
    height=512, width=512,
).images[0]
That LoRA also responds to style modifiers — append 16-bit pixel art,
32-bit pixel art, or chibi to the prompt to shift the look. They come from the
captions it was trained on, which is the payoff of getting your dataset right: the
words you teach the model become the dials you get to turn at inference.
To use your own LoRA instead, point load_lora_weights at your .safetensors
(or your Hub repo) and swap in your trigger word.
You train on base-4B, but run inference on the distilled
FLUX.2-klein-4B (4
steps), as in the code above. Applying the LoRA on the distilled model typically
gives better results than the base model, and it's faster — so distilled is the
recommended place to run a trained LoRA.
If you'd rather not write code to check your result, the Build Small starter Space has a tab that loads a LoRA and renders base vs fine-tune at the same seed, so you can see exactly what the adapter changed.
Train an edit LoRA
FLUX.2 [klein] also supports editing, so you can also train an edit LoRA —
pass it a photo, get back a transformed version (recolor, restyle, add or remove
an object, swap a background). klein runs both modes through one pipeline:
Flux2KleinPipeline is text-to-image when you don't pass an image=, and
image-edit when you do. So an edit LoRA is just a LoRA whose dataset carries an
input image alongside each target. Same model, same trainer — the difference is
entirely in the data.
To make this concrete, here's one I trained for this guide:
stephenbtl/ugly-kontext-klein-4b-lora
(Apache 2.0). It takes a photo of a pet and redraws it as a deliberately crude
"ugly sketch," keeping the pose and composition of the original. It was trained on
120 paired (input photo, output sketch) examples.

The LoRA in action: a photo goes in (left), the "ugly sketch" comes out (right),
with the cat's pose and framing preserved. This is change the photo the cat into an ugly sketch of the same cat run on the base-4B pipeline with the adapter
loaded.
Three things change from the style recipe.
1. The dataset is paired. Instead of one flat folder, you keep two:
ugly_kontext/
  reference/   inputs         100.jpg, 101.jpg, ...
  target/      edited outputs 100.jpg, 101.jpg, ...
               + captions     100.txt, 101.txt, ...
ai-toolkit pairs reference/<id> with target/<id> by filename stem; the
captions live in the target folder. A clean (input, output) pair carries more
signal than a description alone, so you need fewer examples — 50–200 pairs is
plenty. This LoRA used 120.
2. The caption is an instruction, not a description. A style caption describes what's in the image. An edit caption describes the transformation you want applied. The ugly-kontext captions are just:
change the photo the cat into an ugly sketch of the same cat
change the photo the dog into an ugly sketch of the same dog
change the photo the animal group into an ugly sketch of the same group
No made-up trigger word here. Keep the transformation wording consistent across
the set, and that repeated phrase (here, "ugly sketch") becomes the activation
phrase at inference on its own. You can still add a trigger_word: for stricter
gating, but it's optional for edits.
3. One line in the config. Add control_path: next to folder_path:,
pointing at your reference folder. That single line is what turns a style LoRA
into an edit LoRA:
datasets:
  - folder_path:  "/workspace/datasets/ugly_kontext/target"     # outputs + captions
    control_path: "/workspace/datasets/ugly_kontext/reference"  # inputs ← makes it an edit LoRA
    caption_ext: "txt"
    resolution: [512]   # match your source; bucketing higher just upscales
Everything else — arch: "flux2_klein_4b", the 128/64/64/32 network, lr: 1e-4,
flowmatch, the base-4B target — is identical to the style config. Edit LoRAs
also tend to peak between 1000 and 1750 steps, so checkpoint by eye the same way.
(The repo above ships every checkpoint from 250 to 2000 so you can compare.)
At inference you pass the input photo. This loads the published LoRA directly from the Hub, run on the distilled model:
import torch
from PIL import Image
from diffusers import Flux2KleinPipeline

pipe = Flux2KleinPipeline.from_pretrained(
    "black-forest-labs/FLUX.2-klein-4B", torch_dtype=torch.bfloat16
).to("cuda")
pipe.load_lora_weights(
    "stephenbtl/ugly-kontext-klein-4b-lora",
    weight_name="ugly_kontext_klein_4b_v1.safetensors",
)

reference = Image.open("your_pet.jpg").convert("RGB").resize((1024, 1024))
img = pipe(
    prompt="change the photo the cat into an ugly sketch of the same cat",
    image=reference,
    num_inference_steps=4, guidance_scale=4.0,
).images[0]
(klein wants width and height divisible by 16 with (W·H)/256 ≤ 4096; 1024×1024
is safe.)
The dataset was only cats, dogs, and animal groups, but the transformation generalizes — give it a building and it still applies the same "redraw as a sketch" edit:

A subject the LoRA never trained on. It learned the edit (preserve the structure, redraw it as line art), not just "how to draw cats."
The hard part of an edit LoRA is the data, not the training. Before/after pairs don't fall out of a folder of nice images. Three ways people build them:
- repurpose an existing Kontext-style edit dataset (what ugly-kontext does — its pairs were built for FLUX.1 Kontext);
- generate the targets programmatically (the red-zoom LoRA in the starter Space just crops and upscales the highlighted region — no manual editing at all);
- or run an existing edit model once over a set of inputs and keep the good outputs.
One caveat from this run: ugly-kontext has 120 pairs but only three caption phrasings. The model nails the transformation but generalizes poorly to differently-worded prompts. If you want it to respond to looser instructions, vary the wording — 5–10 phrasings — across the set.
Wrap it in a Gradio app
For this hackathon, you have to submit a Gradio app on a Space, you can use this one if you want to make your life easier. The Build Small starter Space does text-to-image, image editing, running a LoRA, and a training guide in one Space. Duplicate it (top-right menu on the Space) and you have a running klein app on your own account in a couple of minutes — no token, nothing to configure — then edit it down to your idea.
You will still need some compute if you want to train a LoRA but apart from that, everything can be run within this space.
A few things worth knowing before you ship:
- Hosting a ZeroGPU Space needs HF PRO ($9/month) on a personal account. Without it the Space still duplicates and runs for anyone who has it, and it runs free on any CUDA box you own. The 4B model needs ~13 GB of VRAM, so a CPU-only Space can't run it.
- Put
peftinrequirements.txt.pipe.load_lora_weights()fails with "PEFT backend is required" without it — the LoRA space will build but crash at runtime.
Wrap-up
The whole loop is: 15–40 images, content-only captions with a made-up trigger, the arch line intact, and a checkpoint picked by eye around step 750–1500. That's the difference between a clean style LoRA and an overfit one. For an edit LoRA, swap the single folder for paired reference/ + target/ folders, write the caption as an instruction, and add one control_path: line — everything else stays the same. Then wrap it in a Gradio app and ship the Space.
- Models: FLUX.2-klein-4B (distilled, run inference here) · FLUX.2-klein-base-4B (base, the training target) — both Apache 2.0
- The edit LoRA from this guide: stephenbtl/ugly-kontext-klein-4b-lora
- Starter Space to duplicate: klein Build Small starter
- Hackathon: Build Small
- Docs: klein LoRA training · worked example
- Trainer: ostris/ai-toolkit
- Gradio: docs · quickstart · Spaces SDK · ZeroGPU · Server mode


